

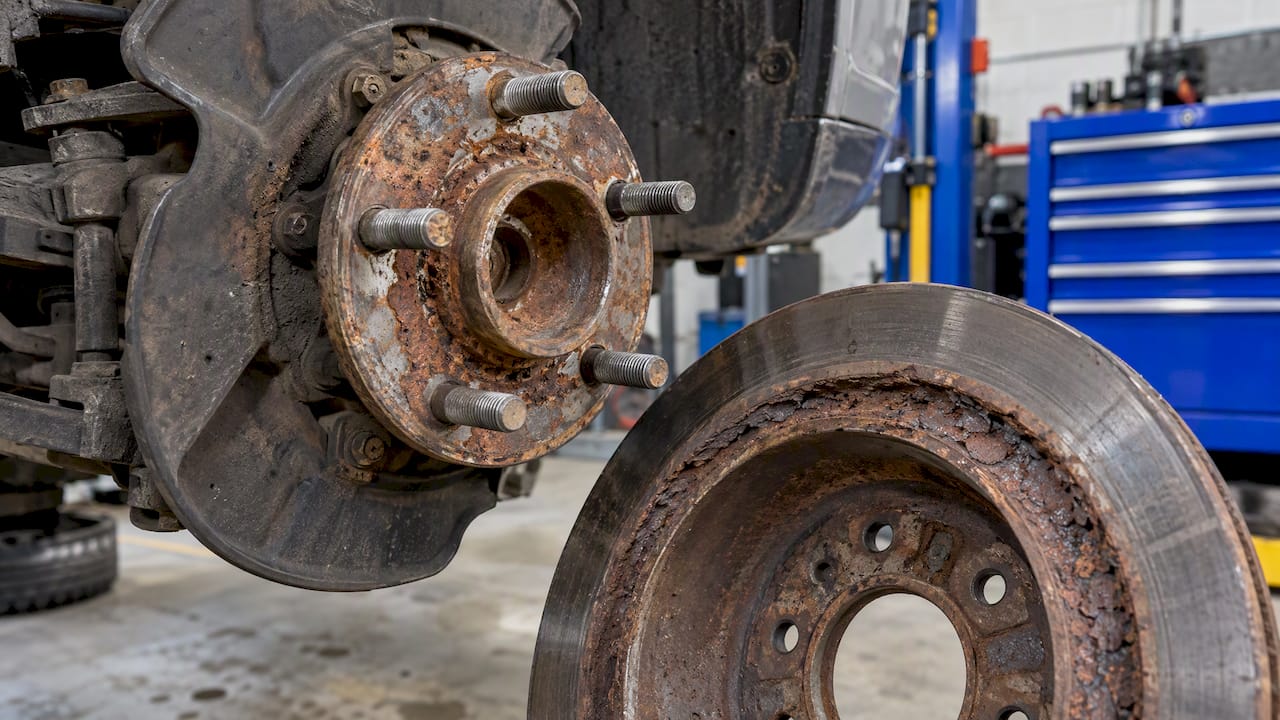
Yes, rust on the wheel hub can cause brake pulsation. When rust, corrosion or dirt builds up between the hub face and the rotor, the rotor no longer sits flat. It wobbles slightly as it turns, the pads touch it unevenly, and you feel that as a pulse in the pedal or a shake in the steering wheel. MOTOR reports that this kind of buildup can push the disc away from the hub, creating excessive runout, uneven wear and pedal pulsation. The good news is that it is often cheap to confirm and fix, if you do it before the rotor wears unevenly.
This guide explains how hub rust leads to pulsation, how to tell it apart from other causes, how to measure it, and what to do next.
TL;DR
- Rust or debris between the hub flange and the rotor can tilt the rotor, causing lateral runout and a pulsing pedal.
- Other common causes include uneven lug-nut torque, sticking caliper sliders and worn wheel bearings, so check these before replacing parts.
- A dial indicator on a stationary suspension part is the reliable way to measure runout. Cleaning the hub face and re-seating the rotor is the first fix.
- If the rotor has already worn unevenly, machining it on the car or replacing it is usually needed.
- Do not put off a pulsing pedal that comes with grinding, a soft pedal or a warning light. Have the brakes inspected.
Table of Contents
- How hub rust creates a pulsing pedal
- Other causes of pulsation to rule out
- Signs that point to a rusty hub or rotor runout
- How to check for hub rust, runout and bearing play
- Cleaning the hub and fixing the runout
- Is it safe to drive with a pulsing brake pedal?
- Our perspective: prevention starts at the hub and the friction surface
- Replacing worn parts with a weather-ready setup
- Bedding in new pads and rotors
- FAQ
- Sources
How hub rust creates a pulsing pedal
A brake rotor is clamped against the hub flange by the wheel. The two surfaces need to meet metal to metal, flat and clean. Even a thin, uneven layer of rust scale changes that geometry. The rotor ends up sitting at a very slight angle, and that angle is multiplied at the rotor’s outer edge, where the pads grip.
This is called lateral runout: the rotor face moves side to side as it spins. Brake manufacturer DBA also notes that a small amount of rust, dirt or debris trapped between the two surfaces can introduce lateral runout and lead to braking problems over time. The key word is over time. At first the pads barely touch the high spots. With every rotation, those spots wear a little more and deposit a little pad material, so the rotor develops thickness variation. That variation is what you actually feel through the pedal.

This is why a problem that begins as a rust issue on the hub often shows up weeks or thousands of kilometres later as a rotor that “warped”. The rotor did not warp from heat alone. It was mounted slightly off, and it wore into an uneven shape.
Why Canadian driving makes it worse
Road salt and brine are the usual culprits. Salt-laden moisture works into the gap between the rotor hat and the hub, and corrosion products take up more space than the original steel. If the vehicle sits for several days, the rust has time to grow. Vehicles that spend long periods parked or driven mostly short distances are particularly exposed, because there is little braking to scrub the surfaces. We cover the related problems in our guides to rotor hat rust in Canada, brine corrosion on rotors and brake rust on stored vehicles.
Rotor surface corrosion is a separate issue. A GM service bulletin from 2024 says that extensive rotor corrosion after long periods parked in humid conditions can cause pulsation through thickness variation. That is rust on the friction surface rather than on the hub, but the symptom is the same, which is why the two are easy to confuse.
Other causes of pulsation to rule out
Hub rust is one cause among several. Before you pull anything apart, consider the others. Auto Service World lists improper wheel installation or lug-nut torque, worn caliper sliders, wheel-bearing wear, and uneven pad wear from a jammed piston among the common ones.
| Cause | What it feels like | Quick check |
|---|---|---|
| Rust or debris on the hub face | Pulsing that appears gradually, often after a brake job or after the vehicle sat | Remove the rotor and inspect the hub flange and rotor hat |
| Uneven or over-tightened lug nuts | Pulsing soon after a tire rotation or wheel removal | Re-torque in a star pattern to the vehicle’s specification |
| Sticking caliper sliders | Pulling to one side, one wheel hotter than the other, uneven pad wear | Check that the caliper moves freely on its pins |
| Worn wheel bearing | Humming or roughness that changes with speed, play in the wheel | Rotate the hub by hand and feel for roughness or play |
| Surface corrosion on the rotor | Pulsing or noise for the first stops after parking | Pulsing fades after several moderate stops |
Lug nuts deserve a special mention. Auto Service World notes that unevenly torqued or over-tightened lug nuts can distort the rotor and cause pulsation. Impact guns without a torque stick are a frequent cause after a tire changeover. If your pulsation started right after seasonal tire swaps, start there.
Caliper slider problems are just as common in Canadian climates, because salt attacks the pins and boots. Our page on caliper corrosion in Ontario goes into how to spot a seized slider. For a wider checklist, see brake judder causes in Canada.
Signs that point to a rusty hub or rotor runout
No single symptom proves hub rust, but a pattern helps.
- Pulsation that was not there before a brake job. If a new set of rotors was installed and the pulsation builds over a few thousand kilometres, a dirty hub face is a prime suspect.
- Pulsation that grows with speed. Vibration through the steering wheel at highway speeds when braking suggests a front rotor or hub issue.
- Uneven wear marks on the rotor. Shiny and dull patches that rotate with the wheel suggest the pads are only touching some areas.
- Visible rust or scale around the rotor hat and wheel studs. Flaking rust where the rotor meets the hub is a clear warning.
- Rust that does not clear. Light surface rust normally wears off in the first few stops. Heavy scaling or pitting that stays after repeated stops needs service. See our explanation of flash rust on rotors for what is normal and what is not.
If you notice any of the following, do not wait for your next scheduled service. Ford Canada advises an earlier inspection for steering-wheel vibration, a soft or sinking pedal, a brake warning light, squealing or grinding, a burning odour, or visibly damaged rotors.
How to check for hub rust, runout and bearing play
If you are comfortable working on your own brakes, or you are a technician, this is the sequence we recommend. Use jack stands on level ground, and follow the manufacturer’s service information for torque values.
- Inspect the wheel and hub area. Remove the wheel and look at the rotor hat, the hub flange and the studs. Look for rust scale, raised spots and debris.
- Check wheel-bearing condition. MOTOR advises rotating the hub bearing assembly by hand to check for roughness, play or noise. A bad bearing can mimic or add to runout, so rule it out first.
- Mount a dial indicator. Attach it to a stationary suspension component, with the tip perpendicular to the rotor face. MOTOR specifies a part like the steering knuckle rather than a moving suspension arm, because a moving mount will give you false readings.
- Torque the wheel fasteners. Vehicle Service Pros says runout should be checked after installation, with the wheel fasteners fully torqued. A loosely held rotor will measure differently from one clamped properly.
- Rotate the rotor by hand and read the gauge. Compare the total movement to the vehicle manufacturer’s runout specification. We do not quote a single number here because limits differ by vehicle.
- Measure thickness. Use a micrometer at several points around the rotor. Variation means the rotor has already worn unevenly. Our guide to minimum rotor thickness checks covers the technique and the discard limit stamped on the rotor.
If you do not own a dial indicator, a shop can do this in minutes. Ask for a runout check specifically, not just a rotor replacement quote.
Cleaning the hub and fixing the runout
When the measurement shows excess runout and you find rust on the hub flange, the first step is simple: fix the mounting surface. Vehicle Service Pros says that if runout is excessive, you should reposition the rotor on the hub and re-check it. Depending on the rotor design, you then either correct it with an on-car lathe or replace the rotor.
In practice, the process looks like this:
- Remove the caliper and carrier, support them without stressing the brake hose, and take off the rotor.
- Clean the hub flange and the inside of the rotor hat with a wire brush or a rotating hub-cleaning tool until you see bare, even metal. Do not gouge the surface. Remove loose scale from around the studs.
- Wipe the surfaces clean. If you are also cleaning wheels and calipers while the car is apart, cleaning brake dust safely with a short dwell time keeps contaminants off the freshly cleaned mounting surfaces.
- Refit the rotor, torque the wheel fasteners in a star pattern, and measure runout again.
- If the reading is still high, try the rotor on a different stud position. Index it, re-measure, and note the position with the lowest reading.
Some technicians apply a very thin film of anti-seize on the hub face after cleaning, to slow future rust. Follow the vehicle or rotor manufacturer’s guidance on this, because a thick or uneven coating can introduce its own runout.
On-car machining or replacement?
If the rotor already has thickness variation, cleaning the hub will stop it getting worse but will not remove the pulsation. Toyota’s service bulletin prefers an on-car brake lathe for repairing rotor runout and thickness variation, ahead of replacement and off-car machining. The reasoning is that an on-car lathe machines the rotor relative to the actual hub, so hub-related runout is cancelled out.
Machining removes material, and a rotor close to its minimum thickness cannot be machined safely. In that case, replace the rotor and the pads together. Also replace any rotor with deep pitting, heat cracking, or heavy rust on the hat.
If the hub flange itself is badly corroded, pitted or bent, cleaning will not be enough. Have a technician assess whether the hub assembly needs replacing.
Is it safe to drive with a pulsing brake pedal?
Mild pulsation does not mean your brakes are about to fail, but it is a sign that something is wrong, and it tends to get worse. Pulsation combined with grinding, pulling to one side, a soft pedal or a warning light should be inspected promptly by a licensed technician. Do not defer service when the symptoms point to advanced brake wear or damage.
If the pulsation shows up only during the first stops after the vehicle has been parked in damp or salty conditions and fades quickly, it is likely surface corrosion. The GM bulletin mentioned earlier describes burnishing with 10 to 15 moderate stops from 56 to 64 km/h, with cooling time between stops, and says to refer to the specified service bulletins if that does not correct the condition. Do this only on a safe, clear road with no traffic behind you. If it does not fix the pulsation, stop guessing and have the rotors measured.
Our perspective: prevention starts at the hub and the friction surface
Most pulsation complaints we hear about are not caused by a defective rotor. They come from the conditions around it: salt, moisture, a hub that was not cleaned at the last brake job, and a vehicle that rarely brakes hard enough to clear surface corrosion.

That is the reason we built our products around moisture management. Our HydroAdaptive ceramic pads are engineered to clear moisture quickly and hold a stable friction profile across rain, humidity, snow and cold, so the first stops after a wet or freezing night feel more consistent. Our rotors are designed with corrosion resistance in mind, because a rotor that resists rust on its surface and hat is less likely to develop the thickness variation that drivers feel as pulsation.
We also want to be straightforward about the limits. No pad or rotor can compensate for a rusty hub flange, uneven lug torque or a seized slider. If the mounting surface is dirty, even the best rotor will run out. Our advice to every installer is to treat the hub face as part of the brake system: clean it, measure it, and torque the wheel properly. After that, choose components that are built for the conditions your vehicle actually sees. For drivers on salted roads, a monthly routine from our guide on protecting brakes from road salt corrosion goes a long way. Electric and hybrid owners should also read our notes on regenerative braking on ice, since less friction braking means less natural cleaning of the rotors.
— AAA
Replacing worn parts with a weather-ready setup
Once the hub is clean and you have confirmed that the rotors need replacing, fit pads and rotors designed to work together. Our Type 03 brake pads and Type 07 brake pads use HydroAdaptive ceramic technology, and our SC Type rotors and GC Type rotors are built for corrosion resistance. Where a vehicle-specific kit is available, it saves you matching parts yourself. Examples include the front brake kit for the Mercury Mariner 2005-2011 and the front kit for the Volkswagen Routan 2012-2014. Enter your vehicle on our store to see what fits.

Bedding in new pads and rotors
After new parts go on, follow the bedding or break-in procedure printed in the instructions that come with the pads. In general, that means a series of moderate stops from moderate speed with cooling time between them, and avoiding hard stops or holding the pedal down at a standstill while the brakes are hot. The aim is an even transfer layer of pad material on the rotor. An uneven layer is another route to pulsation, so it is worth doing properly.
For the best result, make sure the new rotor is measured on the car after installation, with the wheel torqued. A reading taken at that stage tells you whether the hub is truly clean and the rotor is seated correctly.
FAQ
Can a rusty hub really make my brakes pulsate?
Yes. Rust or dirt between the hub flange and the rotor can hold the rotor slightly off true, which causes lateral runout. The pads then wear the rotor unevenly, and you feel the thickness variation as pedal pulsation. Cleaning the hub face before fitting rotors prevents most of these cases.
Do I need new rotors if the hub was rusty?
Not always. If the rotor has not yet worn unevenly and is well above its minimum thickness, cleaning the hub and re-seating the rotor may be enough. If measurement shows thickness variation, it needs to be machined on the car or replaced. Rotors close to minimum thickness should be replaced.
Why do my brakes pulsate right after a tire change?
The usual cause is uneven or over-tightened lug nuts, which can distort the rotor. Re-torque the nuts in a star pattern with a torque wrench to the vehicle’s specification. If the pulsation remains, check for rust on the hub face and measure runout.
Is it safe to keep driving with a pulsing pedal?
Mild pulsation that fades after a few stops is usually surface corrosion. Pulsation that persists, or comes with grinding, a soft pedal, pulling or a warning light, should be inspected promptly by a technician rather than put off.
Sources
- Brake Shop: Measuring Brake Discs & Hub Flanges, MOTOR
- Brake Pedal Pulsation, Auto Service World
- GM service bulletin on rotor corrosion and pulsation, NHTSA, 2024
- Brake Rotor Runout, Vehicle Service Pros, 2024
- Toyota service bulletin on rotor runout repair, NHTSA, 2014
- When should I have my brakes inspected?, Ford Canada
- Remove brake dust safely, Diamondbrite