

True heat-induced rotor warping almost never happens in street driving. What you’re feeling is disc thickness variation (DTV) or lateral runout (LRO), and winter makes both worse through salt corrosion, sticking calipers, and thermal shock. A light shudder means book a service appointment. Moderate pulsing means get inspected this week. Violent shaking at the wheel means stop driving and have the vehicle towed.
TL;DR:
- Most brake pedal pulsation is caused by disc thickness variation or lateral runout, not actual warping of the rotor metal.
- Winter accelerates perceived issues through salt corrosion and moisture, which worsen uneven deposits and hub surface irregularities.
- Proper diagnosis requires measuring rotor thickness and runout with tools like a micrometer and dial indicator, rather than assuming warped rotors are the cause.
- Resurfacing rotors is only effective if they have enough remaining thickness above manufacturer minimums; otherwise, replacement is safer.
- Preventative winter maintenance, including caliper lubrication and proper torque procedures, reduces the risk of DTV and runout recurrence.
Table of Contents
- Signs of warped rotors and why winter makes them worse
- What actually causes rotor warping, and why the myth persists
- Winter-specific triggers behind rotor surface problems
- How a shop actually diagnoses the problem
- Repair options: resurface, replace, and what it costs
- Winter maintenance that actually prevents repeat visits
- Where AAA Frictions fits into winter brake care
- The first three things a mechanic should check
- Winter-ready pads and rotors from AAA Frictions
- Sources
- FAQ
Signs of warped rotors and why winter makes them worse
You’ll feel it before you diagnose it. Pedal pulsation comes as a rhythmic push back against your foot, timed with wheel rotation, usually worse under harder braking from higher speeds. Steering shudder shows up as a wobble through the wheel rim rather than the pedal. Seat or floor vibration is the same wobble transmitted through the chassis.
Cold weather doesn’t create the mechanical problem, but it exaggerates how you perceive it. Stiffer winter tyres transmit more vibration into the cabin. Road salt and slush add grit that can make an already uneven rotor surface feel rougher. Wet pavement means you’re braking more often, which surfaces intermittent issues faster.
Before your service appointment:
- Note the speed range where the shudder appears (city stops versus highway braking)
- Pay attention to whether it happens every stop or only after highway driving
- Avoid riding the brakes downhill or repeated hard stops until it’s checked
- Don’t ignore a pulse that’s getting worse week over week
What actually causes rotor warping, and why the myth persists
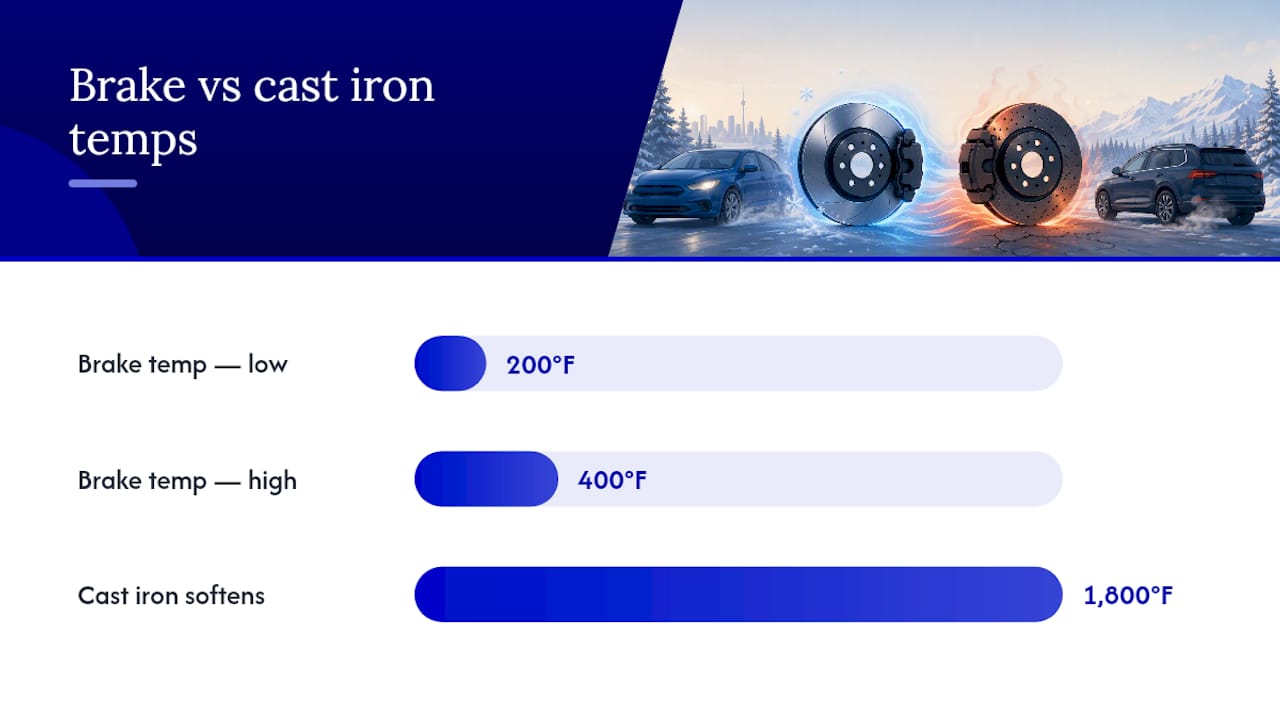
Street brakes typically run between 200°F and 400°F. Cast iron doesn’t start to soften until it hits roughly 1,800°F, a temperature you won’t reach outside a racetrack or a runaway trailer brake fire. That gap is why the term “warped brake rotors” is largely a misnomer for what’s happening under your hood.
What you’re actually dealing with is disc thickness variation and lateral runout. DTV means the rotor’s surface isn’t the same thickness all the way around, so the caliper piston pushes in and out slightly with every rotation, and you feel that as a pulse. LRO means the rotor itself wobbles slightly out of plane as it spins, often from a hub or mounting issue rather than the rotor material itself.
Even very small differences in thickness, on the order of a fraction of a human hair, can produce a noticeable pedal pulse. That’s a fraction of a human hair’s width, and it’s often caused by uneven pad material transferring onto the rotor surface during a hot stop followed by sitting still, not by heat bending the metal itself, according to findings on disc thickness variation.
- DTV: uneven thickness around the rotor face, felt mainly in the pedal
- LRO: rotor wobble from hub or flange misalignment, felt in the wheel and pedal
- Uneven pad deposits: transfer layer builds unevenly after a hot stop and cool soak
Winter-specific triggers behind rotor surface problems
Cold climates create their own path to DTV and runout, separate from anything that happens in summer driving. Four issues show up disproportionately once temperatures drop:
- Thermal shock from slush and cold water. Driving through standing water or slush right after hard braking cools a hot rotor unevenly, which can aggravate an existing transfer layer or micro crack pattern rather than cause a clean warp.
- Caliper slides freezing with ice and corrosion. Moisture works into the slide pins, freezes, and the caliper drags on one side of the rotor longer than the other, wearing thickness unevenly.
- Salt corrosion at the hub face. Road salt eats at the mounting surface, and rust buildup between the hub and rotor hat throws off how flat the rotor sits, which reads as runout even on a brand new part.
- Installation errors surfacing in winter. A dirty hub or lug nuts torqued out of sequence can distort the rotor hat over weeks of freeze thaw cycles, and the resulting runout often gets blamed on “warping” months later.
How a shop actually diagnoses the problem
A competent technician doesn’t guess. A road test comes first, feeling for the rhythm of the pulse against wheel speed to separate a rotor issue from a suspension or tyre problem. If the shudder syncs with one wheel’s rotation, that points at the rotor or hub on that corner specifically, not the whole braking system.
From there, measurement takes over:
- A micrometer checks rotor thickness at multiple points around the face, comparing against manufacturer minimum thickness specs stamped on the rotor hat
- A dial indicator mounted against the rotor face measures lateral runout while the wheel spins, catching wobble that a visual check would miss, a method laid out in how technicians measure rotor wear
- A hub inspection checks for rust, debris, or an old wheel bearing throwing the whole assembly out of true
Pro Tip: Ask your shop for the actual runout number in thousandths of an inch, not just “it’s fine.” Most manufacturers call for under 0.002 inches at the hub; if they can’t produce a number, they likely didn’t measure it.
Repair options: resurface, replace, and what it costs
Whether a rotor gets machined or replaced comes down to one number: remaining thickness against the minimum stamped on the part. Modern rotors are thinner than the cast iron discs from a decade ago, built with less material to save weight, which means there’s often not enough margin left to shave off material on a brake lathe without dropping below spec, a pattern the warped rotor safety guide documents across late-model vehicles.
Machining still has a place. If a rotor measures comfortably above minimum thickness and only has light DTV, a lathe cut restores a flat, parallel surface and can solve the pulse without buying new parts. Once it’s close to minimum, replacement is the safer call, since a resurfaced rotor near its limit heats up faster and re-develops variation sooner.
- Resurfacing typically costs moderate to substantial labor fees per axle
- Replacement parts add additional costs over resurfacing labor
- A full pad and rotor job per axle involves labor and parts costs that vary depending on the vehicle. Refer to service providers for current pricing.
- Replace both rotors on an axle together, even if only one shows a problem, to keep braking balanced side to side
Winter maintenance that actually prevents repeat visits
Prevention beats diagnosis every time, and most of it comes down to habits you control rather than parts you buy.
- Use engine braking on long downhill grades instead of holding steady pedal pressure, which keeps rotor temperatures more even.
- Avoid resting your foot lightly on the brake at stoplights. That light drag builds heat unevenly and encourages deposit buildup.
- Have caliper slide pins cleaned and lubricated each fall before the first freeze, since that’s where ice and corrosion do the most damage.
- Clean the hub mating surface at every rotor change. A thorough brake dust removal routine before reinstalling parts cuts the odds of runout from debris.
- Torque lug nuts in the correct star pattern to spec, never with an impact gun set too high, since overtorquing can distort the rotor hat over time.
- Bed in new pads with a sequence of roughly 8 to 10 moderate stops from moderate speed before demanding hard braking, which builds an even transfer layer from the start.
Pro Tip: If you’re swapping to winter tyres each year, have the shop check rotor thickness and runout at the same appointment. It’s already up on the hoist, and catching DTV early avoids a second visit in January.
Where AAA Frictions fits into winter brake care
We built HydroAdaptive technology specifically for the moisture and temperature swings that winter throws at a braking system. The ceramic formulation is engineered to clear water and slush from the pad and rotor interface quickly, which supports a more consistent transfer layer and helps guard against the uneven deposits that lead to DTV.
A few winter checks worth pairing with any pad or rotor service:
- Confirm your brake pedal feel hasn’t changed after the first cold snap, since a softer or longer pedal often shows up before a visible pulse
- Check whether your calipers are fixed or floating design, since that affects how often slide pins need service
- Ask your installer to confirm hub cleanliness before mounting new rotors, regardless of which brand you choose
The first three things a mechanic should check
Most repeat complaints trace back to skipping a step, not a bad part. Before condemning a rotor, a technician should check hub cleanliness, measure lateral runout with a dial indicator, and confirm lug torque was applied in the correct sequence. A new rotor bolted onto a dirty, corroded hub will pulse again within weeks, and that’s a workmanship problem, not a warranty claim on the part.
— AAA
Winter-ready pads and rotors from AAA Frictions
AAA Frictions builds pads and rotors around the specific problem this article covers: moisture and cold don’t just make brakes feel different, they actively contribute to the uneven deposits and corrosion that cause DTV and runout in the first place. Standard ceramic pads aren’t engineered for that swing between wet, salted roads and dry cold snaps the way HydroAdaptive pads are.

For pads, the Type 03 Brake Pads and Type 07 Brake Pads both use the HydroAdaptive formulation aimed at clearing moisture fast and holding a more consistent friction profile through temperature swings. On the rotor side, the SC Type Rotors carry a semi-coated finish for corrosion resistance at the hub and rotor face, while the GC Type Rotors add a GEOMET coating built for drivers dealing with heavy road salt exposure all winter.
Check fitment by vehicle year, make, and model on the product pages, or browse the complete brake kit lineup if you’re replacing pads and rotors together. If you’re not sure which combination fits your car, ask a fitment question before you order.
Sources
- Warped Brake Rotors
- Disc thickness variation and the myth of warped rotors
- Brake rotor wear and measurement explained
FAQ
Is it okay to drive with warped rotors?
A light pedal pulse can be driven short term to a service appointment, but moderate pulsing already means compromised stopping distance and needs prompt attention. Violent shaking at the wheel means stop driving immediately.
How long can you go with warped rotors?
There’s no fixed timeline since DTV and runout tend to get worse with continued use, not better. A mild pulse might hold for a few weeks; a moderate one can worsen within days, especially with continued hard winter braking.
Is it expensive to fix a warped rotor?
Resurfacing typically costs $80 to $120 per axle in labour, while a full replacement job with pads runs roughly $280 to $450 per axle depending on the vehicle. Machining only makes sense when the rotor has enough thickness left above the manufacturer’s minimum spec.
Can warped rotors correct themselves?
No. Disc thickness variation and lateral runout are mechanical wear patterns that don’t reverse on their own and typically worsen with continued driving until the rotor is resurfaced or replaced. Products like AAA Frictions’ HydroAdaptive pads can help slow uneven deposit buildup going forward, but they won’t undo existing runout.