

Squealing on light stops, a pulsing pedal, or a burning smell most often point to glazed pads or rotors rather than a structural failure, and in most cases you can drive carefully to a shop. If you also notice a soft or sinking pedal, a strong burning odour, or a sudden loss of stopping power, stop driving and arrange a tow instead. The checks and thresholds below will confirm which situation you are facing.
TL;DR:
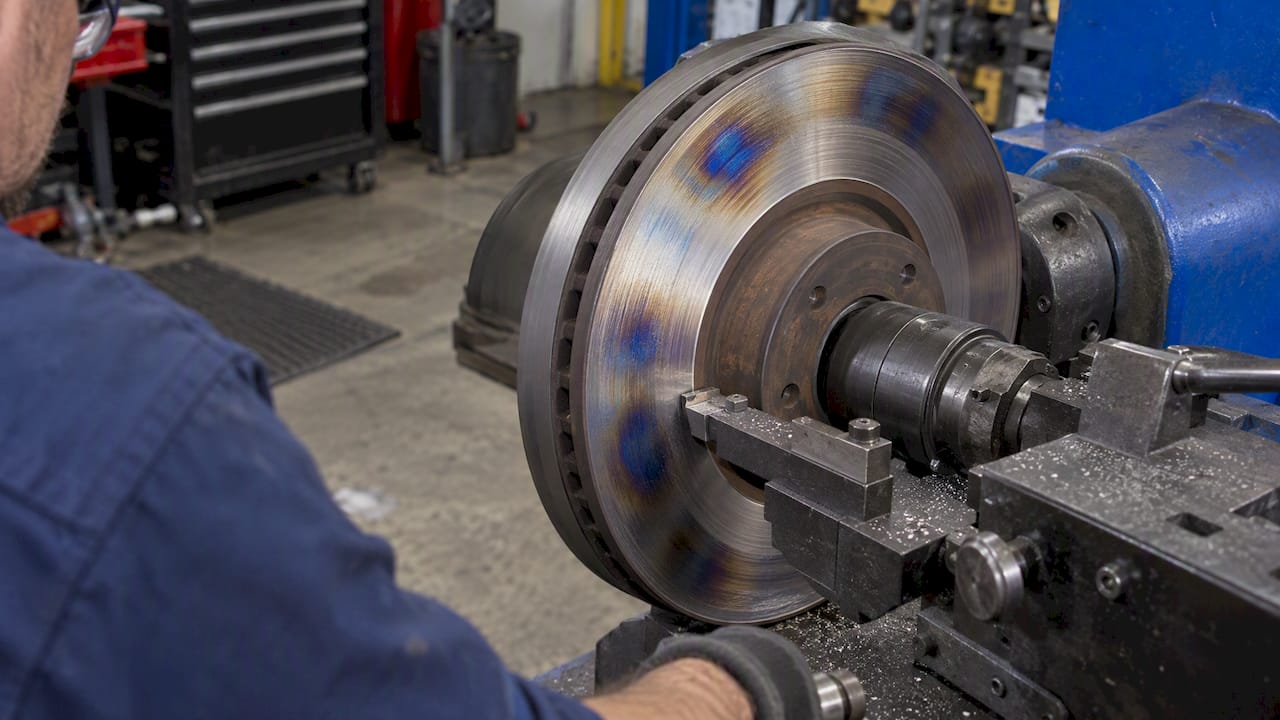
- A glossy pad face and a mirror finish on the rotor contact band point to glazing; bluish patches suggest deeper heat damage.
- Before replacing parts, check lug torque and caliper slide pins, then measure rotor thickness against the OEM minimum and runout if pulsation persists.
- Light pad glazing can often be dressed and bedded again, while rotors may be machined only if their thickness remains above the OEM minimum.
- Replace rotors with deep blue heat spots or pitting; repeated machining will not remove a hardened layer that extends below the cut.
Table of Contents
- Symptoms you will notice and what each typically indicates
- Why glazing happens: heat, pad chemistry, bedding-in, and hardware faults
- DIY inspection and measured checks to confirm glazing
- Step-by-step fixes and replacement criteria
- How proper parts and maintenance reduce glaze risk
- FAQ
- Sources
Symptoms you will notice and what each typically indicates
Glazing rarely announces itself with one clear signal. It tends to show up as a cluster of smaller complaints that build over a few weeks of driving.
- High-pitched squeal on light stops usually means the pad face has hardened or glazed over, reducing bite at low pressure.
- Light squeal that turns into a grind signals pads thin enough to expose backing material, which is a separate and more urgent problem.
- Pedal vibration or steering wheel pulsation is most often disc thickness variation (DTV) from uneven pad deposits, not a bent or structurally warped rotor.
- Burning odour with visible heat spots or blueing points to severe overheating that may have changed the metal itself.
- Reduced stopping power or longer pedal travel reflects the loss of usable friction once a pad face glazes over.
A high-pitched squeal during light braking is one of the most commonly reported early signs of a glazed pad surface, showing up well before any grinding noise appears. What many drivers describe as a “warped” rotor is most often disc thickness variation from uneven pad deposits, and true structural warping from normal driving is uncommon.
Why glazing happens: heat, pad chemistry, bedding-in, and hardware faults
Glazing is a heat problem before it is anything else. Repeated hard stops push pad material past its working temperature, softening the resin binder. When the pad cools under light, steady contact rather than a full release, that softened surface re-hardens into a smooth, glassy layer with far less bite than fresh friction material.
A few mechanical habits accelerate this process:
- Thin, uneven layers of pad material transfer onto the rotor face, creating the high and low spots behind DTV and pedal pulsation.
- Skipping or rushing the bedding-in process after new pads or rotors leaves the friction surface unevenly cured.
- Using a pad compound suited to aggressive driving on a daily commuter (or the reverse) creates a mismatch between heat generation and the pad’s designed temperature range.
- Seized slide pins, a sticking caliper, or uneven lug torque cause one pad to drag or clamp harder than its partner, concentrating heat unevenly across the rotor.
- Visible blue discolouration can signal a hardened cementite layer in the rotor’s surface, a metallurgical change that behaves differently from the surrounding metal and often cannot simply be sanded or machined away.
Pad compounds also have defined operating ranges, and running consistently outside that band is a common root cause worth checking against our brake pad temperature range guide.
DIY inspection and measured checks to confirm glazing
A short, ordered inspection will tell you whether you are dealing with glazing, uneven hardware, or something more serious, before you spend money on parts or labour.
- Look at the pad face. A shiny, glassy surface with little texture confirms glazing; a dull, slightly rough surface is normal wear.
- Check the rotor’s contact band. A mirror-like polished ring where the pad rides is a strong glazing sign; bluish patches within that band point to heat damage.
- Verify lug torque on all wheels to rule out uneven clamping, a frequent and inexpensive cause of pulsation that gets mistaken for rotor trouble.
- Inspect caliper slide pins for binding, dry grease, or corrosion before assuming the rotor itself is at fault.
- Measure lateral runout with a dial indicator, or have a shop do it; provincial inspection guidance calls for runout and parallelism checks whenever pulsation is present, and DTV typically shows up as a repeating high point rather than a smooth, even runout pattern.
- Measure rotor thickness and compare it against the OEM minimum stamped on the rotor or listed in your service manual; see our guide on checking minimum rotor thickness for the process technicians use.
For an illustrated walk-through of the same inspection steps, this DIY brake rotor inspection guide covers the physical checks in more visual detail.
Pro Tip: While you wait for parts or a service appointment, brake gently and early, and avoid towing or carrying heavy loads that push rotor temperatures higher than normal.
Step-by-step fixes and replacement criteria
Not every glazed rotor needs replacing, and not every squeal needs a trip to the shop. The right fix depends on what your inspection actually found.
- Light glazing on pads only: a light sanding or dressing of the pad face, followed by a proper re-bedding cycle, often restores normal bite.
- Re-bedding after dressing or new parts: a measured sequence of moderate stops with full cool-down periods reconditions the friction surface evenly; skipping cool-down periods reintroduces the same glazing problem.
- Resurfacing (turning) the rotor: acceptable only when the resulting thickness stays above the OEM minimum and any discolouration is surface-level rather than a deep heat-affected layer.
- Deep blue heat spots or pitting: machining typically removes material only temporarily, and the same high points often return because the hardened layer runs deeper than the cut; replacement is the more reliable fix in that case. Our rotor pitting guide covers how to tell surface pitting from a deeper problem.
- Persistent pulsation after machining: a sign the root cause (uneven clamping, a sticking caliper, or a deep heat layer) was never addressed, not that the rotor needs cutting again.
| Condition found | Recommended path |
|---|---|
| Shiny pad face, rotor surface clean | Dress pads, re-bed, keep rotor |
| DTV with no blueing, thickness above minimum | Machine or replace rotor, correct torque |
| Blue heat spots or pitting | Replace rotor |
| Thickness at or below OEM minimum | Replace rotor, no machining |
A DIY sanding and re-bedding job costs little beyond time, while machining or replacement at a shop involves labour plus parts, so confirming the actual condition before paying for work avoids spending on the wrong fix.
How proper parts and maintenance reduce glaze risk
We built HydroAdaptive Technology around a simple observation: a lot of what gets blamed on glazing or warping actually starts with moisture and heat working against each other. Our HydroAdaptive formulation clears moisture quickly and maintains friction consistency across rain, humidity, and cold, which reduces the uneven heat cycling that leads to glazed surfaces in the first place.
Alongside the right pad and rotor pairing, a short maintenance routine goes a long way: check slide pins for free movement, torque wheels evenly, and follow a proper bedding sequence on anything new. For vehicle-specific guidance, our product pages list compatible pad and rotor combinations by make and model.

FAQ
How can I tell if my rotors are glazed?
Look for a shiny, mirror-like band on the rotor where the pad makes contact, paired with a glossy pad face rather than a dull, textured one. A high-pitched squeal during light braking is a common early companion symptom, and bluish patches within that band suggest heat damage rather than simple glazing.
Do glazed rotors go away?
Light glazing often improves after a proper re-bedding cycle, since fresh, even heat cycling can restore some friction to the surface. Deeper glazing with heat discolouration usually does not resolve on its own and typically needs machining or replacement.
Is it safe to drive with glazed rotors?
Mild glazing with reduced bite but a firm pedal is generally safe for cautious, short-term driving to a shop. A soft or sinking pedal, a strong burning smell, or a noticeable loss of stopping power means you should stop driving and arrange a tow instead.
What causes rotors to get glazed?
Repeated hard braking without adequate cool-down lets pad material overheat and re-harden into a smooth, glassy layer. Seized caliper hardware, uneven lug torque, incorrect bedding-in, and a pad compound mismatched to your driving style all contribute by concentrating heat unevenly across the rotor.